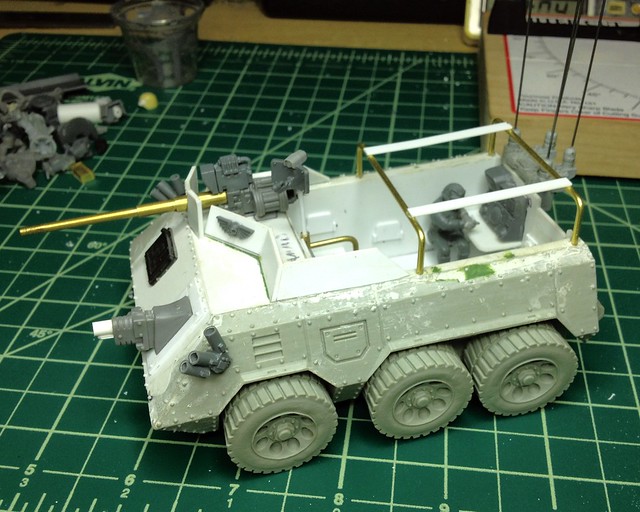
Been slipping on updating again, but not on working! Since the last update I have been pretty darn busy! I painted a bunch of BFG cruisers after I finished the Knights. Then I built my Hydra kit, with a few added details and modifications. After that I finished up my rough riders after I found some legs to use from Curious Constructs. After that I finished up my Salamander Scout Car. More recently I have been working on something special for BFG. A dreadnought class vessel which will be called Triton, I'll hold off on pictures on this for now, but once I finish roughing out the main components you can expect a post. Lastly I finally got some of the new Rebel fighters for X-Wing today and decided to try a new theme, sorta German Luftwaffe inspired color scheme. You can see the test model on the Headhunter below, after the break.
Showing posts with label miniatures. Show all posts
Sunday, August 10, 2014
Friday, May 25, 2012
Dust Warfare: First Impressions
All this talk of Dust: Warfare has got me interested. So, I decided to start it up. I began by ordering an Axis medium Panzer Walker. So, I talked a couple friends into starting it with me and one of them started by ordering the rule book. First impressions on the background, models, and the rules all seem rather positive on our end. I did decide to modify the base models somewhat considering the time saved on construction and priming.
So, once we read a little bit from the book I started getting a list together. To start we chose to make 150 point armies. Below you will see my first platoon which is of the Sturmgrenadiere variety, the jack of all trades for axis platoons. All this was purchased for under $100 through amazon. Nice!
First up we have the command section, the Kommandotrupp squad. There's the officer, a radioman, machine-gunner, rifleman, and an engineer. You can see the universal modification that I made, adding stocks to all of the StG 47 rifles. I also lowered the angle at which the officer is holding his rifle.
Next up is the first of two Battle Grenadier squads. They are the basic troops of the German forces. Not much to modify on this first one. Just the stocks and lowering the Panzershreck on the guy second from the right so that he is looking over it. I also made some leg swaps for better posing.
Here we have the second Battle Grenadier squad. Made some more leg swaps and switched the Panzerfaust in the sergeant's hand for his StG 47. On all of the troops who are shooting their rifles, I cut off the fronts of their necks and glued them so that they appear to be looking down their rifle sights. I then had to fill in the back of their necks with some greenstuff.
This squad is a Laser Grenadier squad, there was not much to do here so to break it up I changed up one of the guys. The leader, in the center, used to have his left arm positioned on the laser rifle, similarly to the troops on either side. So I cut this arm and hand loose and made it so he, like all the other squad leaders, is pointing forward.
The last of the troops are Heavy Recon Grenadiers. Pretty intimidating in their heavy armor. This squad did not take too much either. I had to strengthen the combat knives with super glue since the plastic is sorta soft. I also re-positioned the guy on the right so he is not leaning so far forward. He looked like he was slipping onto his face before if you ask me.
Lastly we have the Medium Panzer Walker. First we have the Ludwig, which is armed with 2 8.8cm guns. You can see the front piece of spaced armor, the gun-shield I added, and the antenna.
Here's a view of the side, where you can see some of the stowage, and the spaced armor covering the engine compartment.
Here is the rear, again showing the spaced armor as well as a rack of Jerry cans.
On this side I added some steps for climbing into the vehicle.
Second we have the Lothar, which has a pair of rocket launchers.
Lastly there is the Luthor, armed with a claw and a Flak Cannon. All three of them look pretty cool in my opinion, and I cannot wait to check them out in game. The model had minimal flash and did not take too long to clean up. Some of the parts did not have adequate glue and broke, so I had to re-glue them.
This picture shows a test of the camouflage pattern I was trying out for the infantry. It's based on late war German camo patterns. I decided I liked the way it looked, but I switched the base color from German Fieldgrey to Catachan Green. I was originally going to paint them as Afrika Korps, but the models are wearing heavier clothes and gloves not really suited to North Africa.
Having decided to use this type of camo I decided to do a full test model using the officer. His hat and trousers are German Fieldgrey from Vallejo, his armor is a dark green from Tamiya, and his camo smock is as shown above.
On his chest and left shoulder is the Balkenkreuz, a stylized version of the Iron Cross and symbol of the Wehrmacht.
His right shoulderpad displays his rank of Oberleutnant, or 1st Lieutenant.
I am very happy with my decision to start this game so far. I like the models, they had little flash and very little cleaning. The only dislike I had was the softness of the plastic. It means that thin things like rifles and knives are easy to bend and most of them came warped. You should go through and add thin bands of super glue to harden them and position them as they should be. Other than that all that I really had to do was glue the torsos and the heads. I chose to do more because of the time saved due to pre-assembly and in all it still took less time than if you would have had to clip sprues, clean flash, and glue everything together. They're in 1/48 scale meaning there's a load of historical kits out there waiting to be used and converted or whatever. I like the WW2 setting and I think that they did a good job in how they got rid of the Nazis. Stuff has to be PC these days...
Sunday night, I will be facing my friends Allies, or my other friend's Axis. My brother is still undecided but we're trying to swing him to play the SSU.
Look for another table post Sunday or Monday if I get enough done, then a review of how I felt about finally playing Dust.
So, once we read a little bit from the book I started getting a list together. To start we chose to make 150 point armies. Below you will see my first platoon which is of the Sturmgrenadiere variety, the jack of all trades for axis platoons. All this was purchased for under $100 through amazon. Nice!
First up we have the command section, the Kommandotrupp squad. There's the officer, a radioman, machine-gunner, rifleman, and an engineer. You can see the universal modification that I made, adding stocks to all of the StG 47 rifles. I also lowered the angle at which the officer is holding his rifle.
Next up is the first of two Battle Grenadier squads. They are the basic troops of the German forces. Not much to modify on this first one. Just the stocks and lowering the Panzershreck on the guy second from the right so that he is looking over it. I also made some leg swaps for better posing.
Here we have the second Battle Grenadier squad. Made some more leg swaps and switched the Panzerfaust in the sergeant's hand for his StG 47. On all of the troops who are shooting their rifles, I cut off the fronts of their necks and glued them so that they appear to be looking down their rifle sights. I then had to fill in the back of their necks with some greenstuff.
This squad is a Laser Grenadier squad, there was not much to do here so to break it up I changed up one of the guys. The leader, in the center, used to have his left arm positioned on the laser rifle, similarly to the troops on either side. So I cut this arm and hand loose and made it so he, like all the other squad leaders, is pointing forward.
The last of the troops are Heavy Recon Grenadiers. Pretty intimidating in their heavy armor. This squad did not take too much either. I had to strengthen the combat knives with super glue since the plastic is sorta soft. I also re-positioned the guy on the right so he is not leaning so far forward. He looked like he was slipping onto his face before if you ask me.
Lastly we have the Medium Panzer Walker. First we have the Ludwig, which is armed with 2 8.8cm guns. You can see the front piece of spaced armor, the gun-shield I added, and the antenna.
Here's a view of the side, where you can see some of the stowage, and the spaced armor covering the engine compartment.
Here is the rear, again showing the spaced armor as well as a rack of Jerry cans.
On this side I added some steps for climbing into the vehicle.
Second we have the Lothar, which has a pair of rocket launchers.
Lastly there is the Luthor, armed with a claw and a Flak Cannon. All three of them look pretty cool in my opinion, and I cannot wait to check them out in game. The model had minimal flash and did not take too long to clean up. Some of the parts did not have adequate glue and broke, so I had to re-glue them.
This picture shows a test of the camouflage pattern I was trying out for the infantry. It's based on late war German camo patterns. I decided I liked the way it looked, but I switched the base color from German Fieldgrey to Catachan Green. I was originally going to paint them as Afrika Korps, but the models are wearing heavier clothes and gloves not really suited to North Africa.
Having decided to use this type of camo I decided to do a full test model using the officer. His hat and trousers are German Fieldgrey from Vallejo, his armor is a dark green from Tamiya, and his camo smock is as shown above.
On his chest and left shoulder is the Balkenkreuz, a stylized version of the Iron Cross and symbol of the Wehrmacht.
His right shoulderpad displays his rank of Oberleutnant, or 1st Lieutenant.
I am very happy with my decision to start this game so far. I like the models, they had little flash and very little cleaning. The only dislike I had was the softness of the plastic. It means that thin things like rifles and knives are easy to bend and most of them came warped. You should go through and add thin bands of super glue to harden them and position them as they should be. Other than that all that I really had to do was glue the torsos and the heads. I chose to do more because of the time saved due to pre-assembly and in all it still took less time than if you would have had to clip sprues, clean flash, and glue everything together. They're in 1/48 scale meaning there's a load of historical kits out there waiting to be used and converted or whatever. I like the WW2 setting and I think that they did a good job in how they got rid of the Nazis. Stuff has to be PC these days...
Sunday night, I will be facing my friends Allies, or my other friend's Axis. My brother is still undecided but we're trying to swing him to play the SSU.
Look for another table post Sunday or Monday if I get enough done, then a review of how I felt about finally playing Dust.
Labels:
2,
dust,
Dust: Warfare,
fantasy flight games,
gaming,
germans,
grenadiers,
II,
miniatures,
table,
tabletop,
top,
two,
war,
warfare,
wargaming,
whermacht,
world
Friday, May 18, 2012
Building a Gaming Table [Part 3]
Now for another installment of this series. Got a lot of work done this week, lots of glue and sand and paint involved. I got to do some work on Sunday as well as Thursday of this week, unfortunately I forgot my camera both days, fortunately Kevin has an iPhone and it takes a decent photo.
First up the clay lifted a bit due to shrinkage, I had not really run into this problem using this clay on smaller areas and I bought it since it said minimum shrinkage. However, most of the areas I put it lifted and separated completely from the foam. Nothing a little bit of Elmer's glue could not fix though.
So, after those were all glued down I got to work mixing up some sand and various sizes of ballast to make the flocking mix. Also mixed a couple of bottles of Elmer's with some water to glue it down with.
Then it was time to paint on the glue and pour the sand mix in as well. It's important that you tape off the sides before you start this because any wetness on the sides would have kept the tape from sticking and would interfere with staining later on.
Whenever I do flocking I tend to really pour the stuff on, it's better to have too much than too little. The added weight helps keep it in place while the glue sets and helps more flock actually get worked into that glue.
This leaves us with a table that looks like a sandbox. For this night we only flocked up to the edge of the urban portion in preparation for the roads.
Speaking of roads, some 1/8 inch foam tape is used to form the borders for the next step. I had a layout figured out and measured and marked all of the road edges.
Next it was time to pour the roads. For this I use water putty since it dries faster and stronger than plaster of Paris. It weighs about the same and is also a little easier to work with in cases where there is sculpting involved.
I used a tape knife to level and smooth out the putty to fill the designated areas, in this case plaster may have been easier to work with. This is where we left off for Sunday as the hour was late and we ran out of putty before I was done with the roads.
Thursday began with cleaning out a shop vac and then vacuuming up the excess sand mixture from the previously flocked side of the board.
It took far too long for my liking and was far too loud, but still faster and more effective than sweeping.
After that I finished pouring the roads and we waited for them to dry up a bit. Once that was done it was time for some battle damage. So the Stukas were called in for a bombing run.
This is where the road vanishes and the wastes begin and so the end of the road has got to be a bit rough. The hammer ended up being a mistake as it caused so much vibration that this section of road lifted from the foam. Again, lesson learned, again Elmer's fixed it.
The end of the derelict road.
I made an assortment of sizes for the road damages, some autocannon some strafing runs etc.
Then we flocked the rest of it. I also added some debris around the craters on the roads.
Next, I painted up the far end of the board. I used spray paint and it went very quickly, I also painted some of the terrain I made awhile back and flocked along with the board.
The urban part of the city got a black base coat and some gray variations. The road is going to be gray, so that got a pretty solid coat of gray. This picture makes it look as if there is more urban than dirt, but this is not true, it's pretty close to 50/50.
First up the clay lifted a bit due to shrinkage, I had not really run into this problem using this clay on smaller areas and I bought it since it said minimum shrinkage. However, most of the areas I put it lifted and separated completely from the foam. Nothing a little bit of Elmer's glue could not fix though.
So, after those were all glued down I got to work mixing up some sand and various sizes of ballast to make the flocking mix. Also mixed a couple of bottles of Elmer's with some water to glue it down with.
Then it was time to paint on the glue and pour the sand mix in as well. It's important that you tape off the sides before you start this because any wetness on the sides would have kept the tape from sticking and would interfere with staining later on.
Whenever I do flocking I tend to really pour the stuff on, it's better to have too much than too little. The added weight helps keep it in place while the glue sets and helps more flock actually get worked into that glue.
This leaves us with a table that looks like a sandbox. For this night we only flocked up to the edge of the urban portion in preparation for the roads.
Speaking of roads, some 1/8 inch foam tape is used to form the borders for the next step. I had a layout figured out and measured and marked all of the road edges.
Next it was time to pour the roads. For this I use water putty since it dries faster and stronger than plaster of Paris. It weighs about the same and is also a little easier to work with in cases where there is sculpting involved.
I used a tape knife to level and smooth out the putty to fill the designated areas, in this case plaster may have been easier to work with. This is where we left off for Sunday as the hour was late and we ran out of putty before I was done with the roads.
Thursday began with cleaning out a shop vac and then vacuuming up the excess sand mixture from the previously flocked side of the board.
It took far too long for my liking and was far too loud, but still faster and more effective than sweeping.
After that I finished pouring the roads and we waited for them to dry up a bit. Once that was done it was time for some battle damage. So the Stukas were called in for a bombing run.
This is where the road vanishes and the wastes begin and so the end of the road has got to be a bit rough. The hammer ended up being a mistake as it caused so much vibration that this section of road lifted from the foam. Again, lesson learned, again Elmer's fixed it.
The end of the derelict road.
I made an assortment of sizes for the road damages, some autocannon some strafing runs etc.
Then we flocked the rest of it. I also added some debris around the craters on the roads.
Next, I painted up the far end of the board. I used spray paint and it went very quickly, I also painted some of the terrain I made awhile back and flocked along with the board.
The urban part of the city got a black base coat and some gray variations. The road is going to be gray, so that got a pretty solid coat of gray. This picture makes it look as if there is more urban than dirt, but this is not true, it's pretty close to 50/50.
Next week I will begin dry brushing the flock and cleaning up the edges of the overspray. I'll also be adding details like road stripes and the like. Got a lot done but there is still plenty left to do!
Labels:
40000,
40k,
battle,
DIY,
game,
gaming,
miniatures,
river,
roads,
table,
tabletop,
terrain,
wargaming,
warhammer
Subscribe to:
Posts (Atom)
