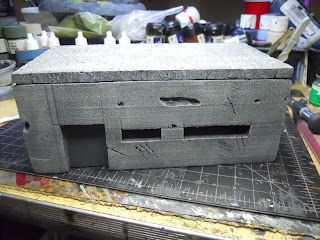
Now that I've finished with college, I have had some time and motivation the last two nights to get some work done on those bunkers. First thing I did was cut out all of the windows and doors. Next, I decided I did not like the angled tops, the lines were not very straight and they really did not fit too well. So, I got some styrofoam sheet and cut it to fit. Then I glued on some tabs so they stayed in place while on top of the bunkers. After that I added some battle damage, some with the knife and some with the soldering gun.
Today I started the painting process. This began with some craft store charcoal gray. Once coat on the inside then another one on the outer surfaces.
Next up came the first layer of dry brushing. For this one I used Vallejo Green grey and a broad flat brush. The color is pretty green, but it really helps add tonal differences beneath the grays.
After that came a layer of codex gray, again using the large brush for drybrushing on the paint.
Lastly I used another gray I have, which I can never remember the name or brand of. It's a bit lighter than codex gray, but with a slight yellow/green tone which I really like.
After that I added white identification banding to all of the bunkers. Along with roman numerals. Finally I added some scorch marks to the damage I added with the solder gun. This was was done with MIG productions black pigment. Finally I painted the doors boltgun and washed them in delvan mud.
Here's the back of the bunkers.
Some troops manning the defenses.
Lastly, here are some guardsmen on the outside for scale.
Thanks,
hope you enjoyed the post, feel free to comment.


I shall enjoy making that battle damage a reality with your men inside.
ReplyDeleteThat's right, only my Imperial Guard are allowed inside.
Delete