Thursday, June 28, 2012

New table, new terrain! [Part 5]

So, another week and some more progress on the buildings.  All I could really do was glue down some texture and so that's what I did.  Step one is to brush on some glue.


Step two is to pour on some flock and do it 12 times until all of the buildings are done....  It was rather repetitive and took a good amount of time to do this step.  I had time to do more work but the elmer's take so much time to dry that there wasn't time to prime once it was done.


This weekend I will get the priming done and then we will be trying out 6th edition or playing some more Mordheim. While I was working the rest of the lads were playing some Mordheim when this happened. Yeah, sort that out for yourself.  I tried to make the table pretty "tiltproof"  guess I failed...


Also, another a member of our group has returned to us after a while away from gaming.  He brought 2 Leman Russ tanks which I bought from him to use with my Forge World Turrets.  I need to strip them to repaint them so for tonight they are soaking in Simple Green.  This is the first time I am using it so I really hope it works out.  From what I understand it's the best way to strip plastics.  I am also going to strip my Baneblade for repainting if this proves to work out.


Stay tuned, next week should see some start to the painting of all of the buildings.

Wednesday, June 20, 2012

New table, new terrain! [Part 4]

Okay, some more terrain updates.  I spent the last gaming night working on the basing for the buildings.  I added some texture to all of the hardboard in the form of water putty.  I also added some bits and lots of rubble pieces. There are lots of buildings to work on...


Here's a close up of one which I incorporated an Aegis line piece into.


A shot of some more of the buildings.  I believe there are somewhere from 8-10 pieces.


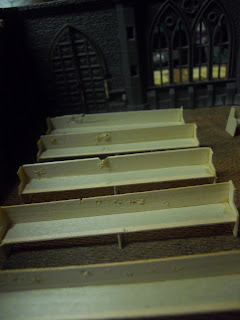
So while I was going to do the flocking as well, the rest of the gang started a new Mordhiem campaign.  They needed a lot of the buildings for their game, because it's not Mordheim without buildings.  In order to keep working,  I decided to start working on the pews for the church.  Here's the test one I did with Andy's spare balsa sheets.


Then I cut out all of the parts for 9 more of them...


And got to assembling them all.  Here's a little gauge I made to make sure the legs were all the same height.


Then 10 finished pews appeared in the church.  The congregation was happy that they finally had someplace to sit as they worshiped the Emperor and the dice gods.  A statue from a LoTR set will stand in for some sort of saint and the altar will be made of 2 d6 dice which will get a wood top.


As the people were worshiping, some chaos folk cam in and shot the place up. How rude! On this side we have some flamer damage, bullet holes, and shotgun blasts.


On the other side there are more bullet and shotshell holes.


So there we have it, a church in a warzone.  Next week I will be flocking all of these buildings and perhaps priming them as well.  It's going to be a long process on these and I still have an entire list of other terrain features I want to add to the collection to update it.


-Raised Pipes
-3ft Defense Wall
-6x Tanks Traps
-6x Fences
-Scatter Terrain
-Supply Dump
-HQ Emplacement
-4x Emplacements

Plus some other random stuff I already started, like a small LOS blocking hill, a couple ruined vehicles, and an overrun lascannon emplacement.  Wish me luck.

Tuesday, June 12, 2012

New table, new terrain! [Part 3]

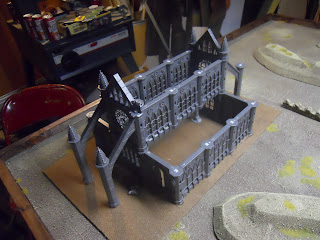
Okay, so we've had these ruins for quite some time, so they are not technically "new" but they will seem like new when I get through with them! Step one is basing them all.  I think we have a total of 12 plastic buildings.  So this will be no small feat.  So we collected most of them here for viewing.


Next we had to cut up the hardboard which was purchased with the rest of the table supplies a while back.  My brother did not come with us today so I was forced to have Andy and Kevin help me maneuver the sheet over the table saw.  As a result, some of the edges are not the straightest possible though they will do fine for terrain.  Kevin also had a knack of pushing the material into the blade and pinching it, of course he would not admit to it.  The problem mysteriously vanished when Andy held the outside edge. Hmm...


Once I had the strips of a couple widths cut I could manage most of the further cutting on my own and measured and cut out the pieces for each building.


The next step was to take the buildings off of their old cardboard bases, clean them up a bit, make any repairs, add any extra details, or anything else that needed to be done.  So in letting Andy use my hobby knife he decided to use it to block a smack for some wise talk.  Absent mindedness is not a good thing when handling sharp objects.  There's a reason I used all the power tools.  So, I get a nice 1 in wide gash in my wrist.


After I tended to my wound I finished what I could on our chapel.  It needs a roof still, and the second layer shall be removable so that the interior can be accessed.  I will probably also make some pews and an altar and such for it.


The buildings got glued down to their new hardboard bases and that was pretty much all the work there was to do.  Of course we had the Stanley Cup game playing on the laptop, if you could call it a game...


So, we finished up with a game of Dust: Warfare.  150 pts Andy vs. I, Axis Vs. Axis.  We played corner deployment, secured area, and the one where you get to the enemy deployment.  In the end it was a draw.  We each killed one enemy unit of Battle Grenadiers with neither of us making the enemy's deployment with any units.  Mostly due to the lines of minefields we laid everywhere.  It was still fun, the fortifications were an interesting addition, and we caught a mistake or so more in how we have been playing.


Next time we're there I will be cleaning all of the buildings, as they are rather dusty.  I will also try to do most, if not all of the groundwork and flocking.  If I have time I will add any extra details and to the base coats of spraypaint.  We'll see.  I think painting all this terrain is going to take even more time than building the table.  I still have other terrain to finish, like the sentinel piece and a ruined land raider.  Some of the older pieces need a retouching as well and we still need more scatter terrain and barricades.  A lot of work to finish, so stay tuned!

Saturday, June 9, 2012

Dust Warfare: Update

So, got two more games of Dust in last week.  One was 150pts against Andy's Axis.  We played an objective based game,  by the end I had a handful of troops left and held on of my objectives, the bridge.  My dice were not with me again and I could not do much harm, whereas Andy shot me all over the place.  We caught a lot of things we missed in our first game like blitzkrieg is only for move orders.  We used medics and engineers properly,  radios issuing orders out of control range and a few other minor things.  They sorta came out over the course of the game and we were both still sorta learning as we went.  Andy read up on the rules beforehand while I was working on the table.  The second game was also 150pts but we did a 1v1v1 game with Andy, Kevin, and I deploying on an edge each.  We played objectives again, but it saw that you can just kill everything and win in these smaller games.  Speaking of killing, it's something that my dice actually allowed this game. This game was really fun with units and walkers dying spectacularly left and right.  Turn 2 I believe it was, had my Ludwig maim Kevin's light walker then his other light blew up the Ludwig and my Battle Grenadiers reacted and blew up the light walker.  Meanwhile some of Kevin's Rangers grenaded Andy's Lothar to death.  This left my untouched Hans and Kevin's light walker with 1 hit left as the only two vehicles left.  In the end I had part of a command squad and some grenadiers holding the bridge and Andy had 2 partial squads left and finished me off.  I think he had 6-7 models left in the end and he won it.

All in all my original opinions of Dust remain.  Though the things we forgot are really important and really added to the game in a great way.  Reactions are great and really useful at times.  I can't wait to play again.


On the hobby side I got my three camo colors for my walkers.  There they are, flammable and everything.  I really like Tamyia for airbrushing, especially when using the Tamiya thinner.  You can really thin them down and they still cover extremely well.  I would say they are much better suited to the airbrush than regular painting where they sometimes pull off with additional brushstrokes.


Here we see the disassembled walkers have received their first coat, they look like they belong in a desert at this point, but I'm going for a camo scheme I really liked on some German tanks I've seen.


Next I added the brown to everything, I was really liking where it was going at this point and all was going well.


This continued as I finished with the dark green.  Here's a pic of the Ludwig.


And one of the Hans.


Still a lot of work to do on these two, but I had the time to use the airbrush and had to do so today.  They need all of the metal and details picked out, weathering and damage done, and finally some decals.  I may get those from the dust game website.  I have finished painting the Kommandotrupp as well as a squad of Laser Grenadiers, one of the Battle Grenadier squads is also base colored.  Just took a break from them to do the airbrushing.  Some pictures of them later on.

Thanks for stopping by.

Building a Gaming Table [Part 5]

So, it's been a few weeks since the last table update but that certainly does not mean I was not working on it.  The week before last was just not visually productive enough to really warrant a dedicated post.
That Sunday began with the observation of some technical difficulties.  The resin shrunk much too much ended up looking like the picture below.  It lifted from the bottom in some places, shrunk away from the right side and lost much of its gloss.


The main work was applying the clearcoat to the table.  I put down three coats during the time I was there and used about a can and a third.  Each coat only took a few minutes to do but I waited about 30-45 minutes between each coat.  The matte finish was sufficiently matte and it did not alter the appearance of the table's surface in any appreciable manner.


After that was done I used some water based water effects to fix up the river.  I mixed in some green and brown paints to murk it up a bit, overall I actually prefer these colors to the original blue.  It really looks like an algae/waste filled river.

After I did that is when Kevin and I played our first game of Dust: Warfare, which has a battle report here.  These guys are my Heavy Recon Grenadiers watching over the bridge.


This last week began with some more water effects to texture what was done last week.  Next it was on to adding some static grass to the wasteland.  I used a dark green and a dark tan grass put down with some watered down Elmer's.  I mixed the two colors up and added them in different patterns to make it a little less uniform looking.


I left the big clumps until the glue is almost dry, the additional weight helps push more of the grass into the glue and helps more fibers get stuck well enough to give better coverage.


While that was drying I began work on the cup holders and my brother got to work on staining the wooden parts of the table.  Looks really nice.


Here's a closeup of the cup holders, gotta add some more support to the front and round the edges so that shins and drink holders are both better protected.


I also ended up adding some water to a few of the deeper craters.  I guess it has rained recently on the tableland.  It will help models stand better on them and help reduce tilts of the dice.


Here we are with the pretty much finished urban side of the board.


Now there's the wasteland, the excess grass has been vacuumed away and it's ready for some gaming!  We played a couple more games of Dust, but I can't wait to really play some large games over the entire thing.
There's still some work to do, but this table is pretty much done.  Most of the work time will now start going into upgrading our terrain set to be more practical and better to look at.